User guide
Note: This program requires the Microsoft .NET framework version 2 or later to be installed on your computer.
The Illuminator Reference Files program was designed to aid the production of reference files for use with Illuminator. While it is possible to create reference files from within Illuminator, this stand-alone program allows the rapid production of a large number of reference files, for example specific to one region of the genome. To use the program, it is necessary to download and decompress the sequence data for the chromosome(s) of interest. These can be obtained from here and decompressed with 7-Zip (a free application). Illuminator Reference Files extracts the details of each gene's transcript from a text file created by the CCDS project; the annotated file can be obtained from here.
Data entry
Since the program links each sequence file to the correct chromosome using the file’s name, it is important not to change the names of the decompressed files. To enter the sequence data, place the decompressed fasta files (chr*.fa) in an empty folder, press the button (underlined in red in Figure 1) and select the folder. Next, enter the positional information for the CCDS transcripts, by pressing the button (underlined in blue in Figure 1) and select the CCDS data file previously downloaded from the NCBI web site. Finally, to visualise the positions of the transcripts, press the button (underlined in black in Figure 1). This opens the Reference file creation window (Figure 2).
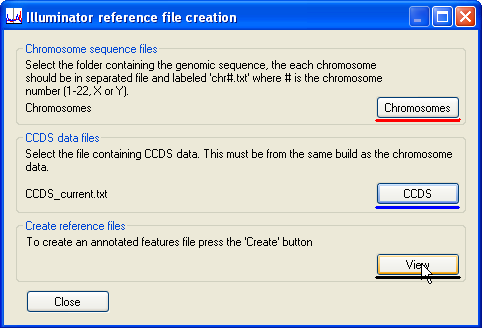
Figure 1
Creating reference files
The Reference file creation window displays the location of gene transcripts for a chromosomal region. The transcripts are arranged as two rows of black rectangles in the Transcripts panel. The upper row represents transcripts on the forward strand and the lower on the reverse strand. Where multiple transcripts are derived from a single gene, a minimum set of all the transcribed exons is displayed. Initially, the displayed region is set to the whole of Chromosome 1. To change the current chromosome, select the desired chromosome from the list (underlined in red in Figure 2).
A specific genomic region can be selected either by entering its upper and lower sequence coordinates, by entering the name of a gene, or by selecting the region using the mouse. Each of these modes is chosen using the list (underlined in blue in Figure 2). Once a specific region is selected, it is possible to expand this region by pressing the button (underlined in black in Figure 2). A transcript may be identified by placing the mouse cursor over a black rectangle and reading the gene’s name from the title bar (as shown by the green rectangle in Figure 2).
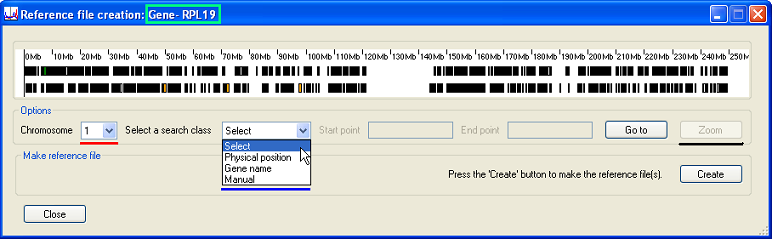
Figure 2
Selecting a region by sequence coordinates
Select the option from the drop-down list (underlined in red in Figure 3) and enter the and of the region in the text boxes (underlined in blue and black in Figure 3). To select the region, press the button; the region will then be delineated by two vertical black lines in the white Transcripts panel.
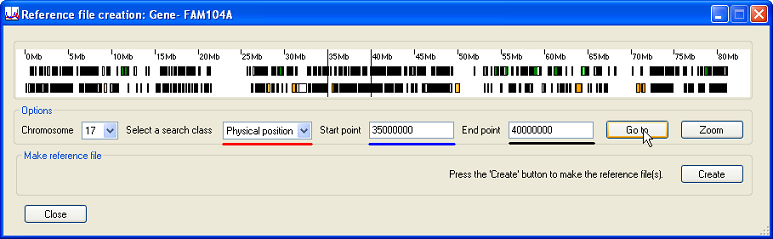
Figure 3
To expand the region, press the button (underlined in red in Figure 4). This will show the transcripts in greater detail, with each gene represented by a black rectangle and its exons shown as either green (forward strand) or orange (reverse strand) blocks.
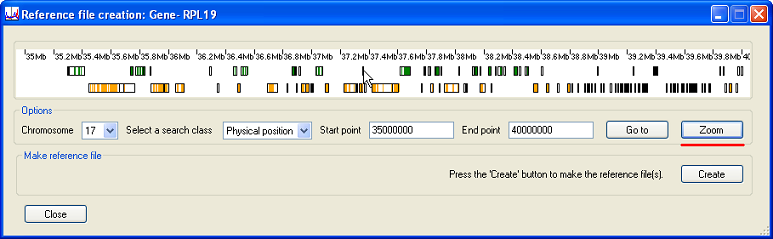
Figure 4
Selecting a region by entering a gene name
To select a gene by name, first select the correct chromosome and then choose the option form the list (underlined in red in Figure 5). Enter the name of the gene in the text box (underlined in blue in Figure 5) and press (underlined in black in Figure 5). If found, the upper and lower limits of the gene will be shown by two black vertical lines in the Transcripts panel. Since the gene may be very short compared to the length of the chromosome, these lines may appear superimposed.
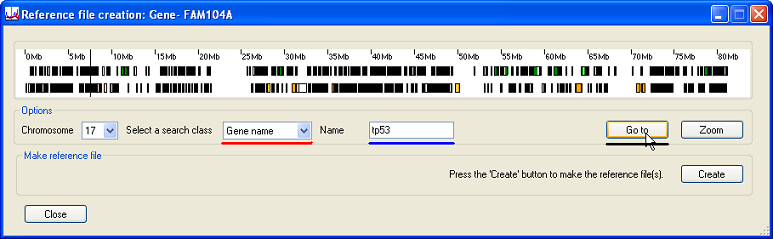
Figure 5
Pressing the button (underlined in red in Figure 6) will expand the selected region to show the gene structure (Figure 6).

Figure 6
Selecting a region using the mouse
To manually select a region using the mouse, select the option from the list (underlined in red in Figure 7). Then place the mouse cursor at the UPPER limit of the region and press the mouse’s right button. Next, place the cursor at the LOWER limit of the region and press the mouse’s left button. The region will be delimited by two vertical lines in the Transcript panel (Figure 7)
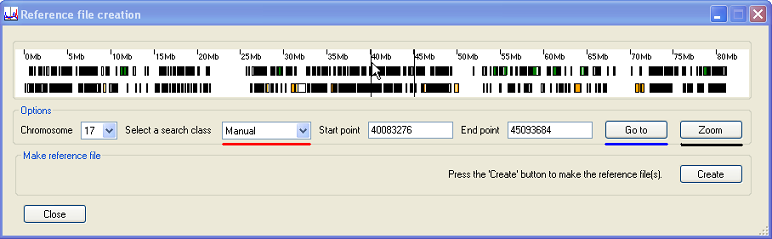
Figure 7
Pressing the button expands the selected region (Figure 8) and the genes in the region can be identified by placing the mouse cursor over each rectangle as described above.
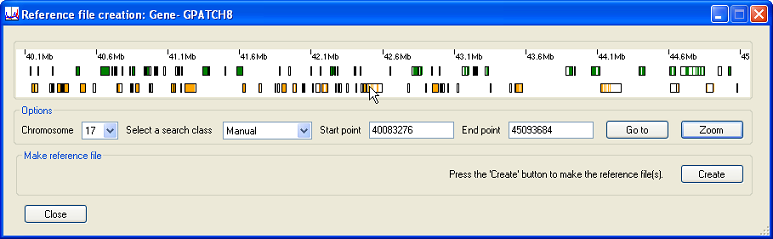
Figure 8
Creating the reference files
Once a region has been chosen by one of the above methods, pressing the button (underlined in red in Figure 9) prompts the user to select a folder in which to save the reference files. Illuminator Reference Files then generates the Illuminator reference files for each of the transcripts in the selected region. If a gene is associated with multiple transcripts, a reference file for each transcript will be created.
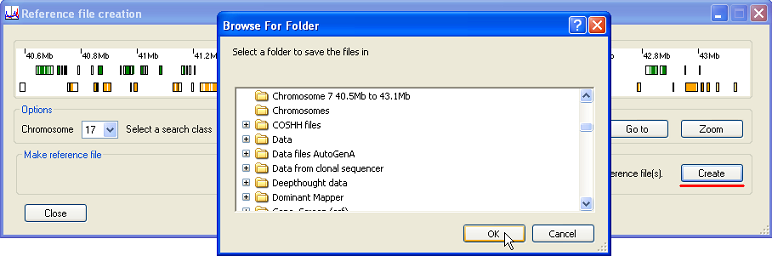
Figure 9
When all the reference files have been created, a message is displayed stating that the process has been completed (Figure 10). Since a minority of the transcripts in the CCDS file contain ambiguous information, it may not be possible to create reference files for all the transcripts. If the region contains a transcript that cannot be used to create a reference file, the gene’s name and transcript ID will be saved to the errorfile.txt file, which is saved in the same folder as the reference files themselves (Figure 11).
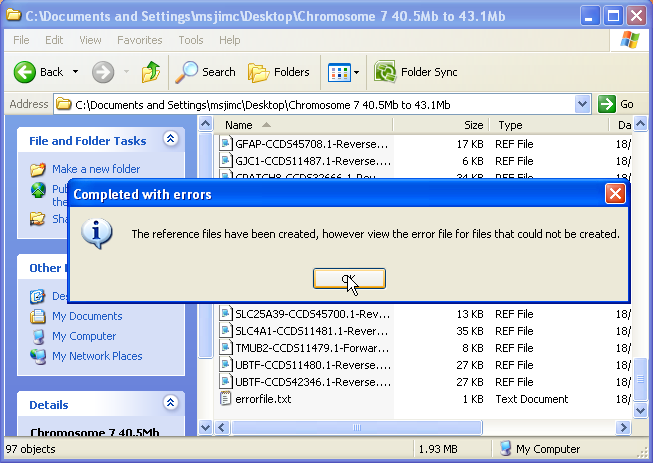
Figure 10

Figure 11