User guide
Introduction
AgilePindelFilter enables the filtering, screening and sorting of indel variants identified in an exome sequencing experiment, to allow the rapid detection of possibly deleterious variants. The variants must first be annotated using Pindel and users may find it useful to read about Pindel before continuing.
Entering data
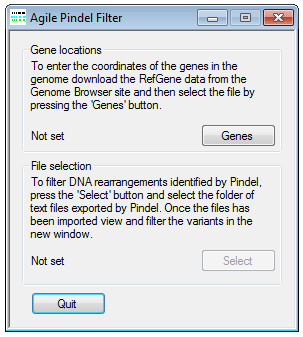
Figure 1: AgilePindelFilter file selection user interface
To correctly annotate the location of the indels in the genome, it is necessary to import a file containing the genomic coordinates of the transcripts. This file can be obtained from the Genome Browser download page as described here. A version downloaded in June 2013 can be found here. Once downloaded, the file is imported by pressing the button (Figure 1). Next, to import the text files previously exported by Pindel, press the button (Figure 1) and navigate to the folder containing only the Pindel data files. Once selected, the indel filtering window will appear (Figure 2)
The indel display interface
AgilePindelFilter displays the indel variant data in its Indel data panel. The first line displays the reference sequence, and each subsequent line an aligned sequence read (numbered at the left-hand side of the panel). These reads can be dragged around the display panel using the left mouse button; the display is redrawn when the mouse button is released. It is also possible to zoom in and out using the and buttons (indicated by the red underlining in Figure 2).
The list (highlighted by the blue line in Figure 2) enables the selection of which indel variant to display, by selecting its ID number. If the variant is located within a gene, the gene's structure is displayed below the Indel data panel, in the Gene location in transcript panel. The location of the variant is denoted by two vertical lines at the top and bottom of this panel. The gene's exons are displayed as black rectangular outlines, and its open reading frame as green or orange fill. ORFs drawn in green represent genes on the forward strand, and those in orange on the reverse strand. Since the sequences in the Indel data panel are aligned to the forward strand, for reverse-strand genes (orange) the actual ORFs and splice sites are the reverse complement of the displayed sequence. If a gene has multiple transcripts, each can be viewed in turn using the Transcript number list (highlighted by the blue line in Figure 2). It is possible to zoom in on the variant by selecting the option (below the red line in Figure 2); alternatively, selecting the option displays the variant relative to the whole transcript. When in Variant view, the locations of individual nucleotides are shown as vertical ticks running across the middle of the display.
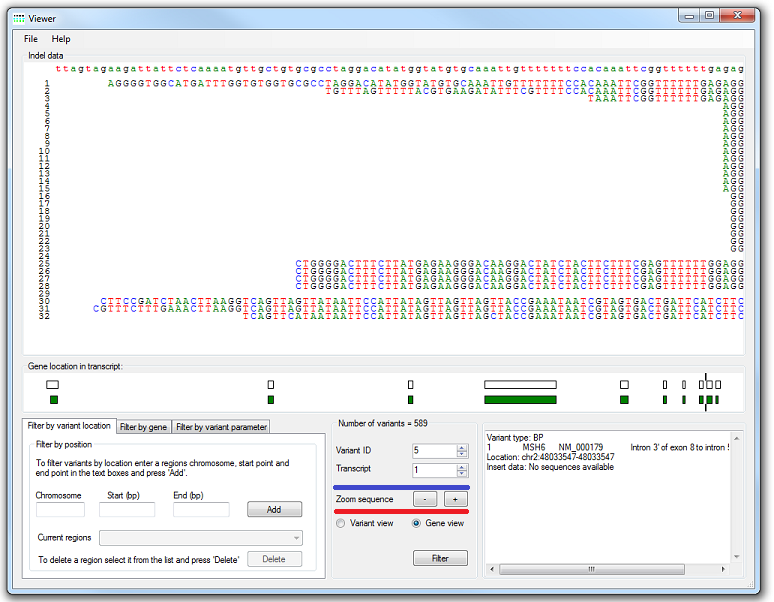
Figure 2: Reads containing the variants are displayed relative to the reference sequence.
Filtering the variants
Variants can be filtered according to their genomic position or by virtue of being located within a given gene, as well as by a number of variant-specific parameters as described below:
Filter by position
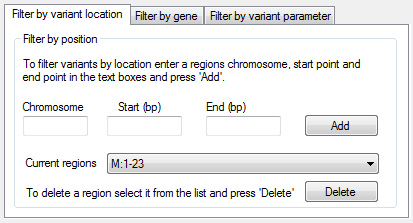
Figure 3: The Filter by variant location tab allows variants to
be filtered by location.
To filter a set of variants based on their location, enter a region in the Filter by position panel on the
Filter by variant location tab at the bottom left of the window (Figure 3). This is done by entering the region's chromosome, start and end positions in the text boxes
and pressing the button. The sex chromosomes are entered as X or Y, and the mitochondrial chromosome as M. To delete a region, select it from the
list and press the button.
It is important that these regions should not overlap.
It is also possible to import regions contained in a text file, formatted as shown in Table 2, using the >
. For example, in this way it is possible to import data containing all the exons included in a pulldown experiment.
Since such a list of exon regions may not include flanking regions of interest, it is possible to extend these regions into the flanking sequence by up to 50 bp, using the
Extend region intervals by: option (see the button described in the Filter by variant parameter section [Figure 5]).
If regions are imported from a file, they do not appear in the list and so cannot be deleted; to delete them, first close the current window and then
reenter the variant data file.
It is important that these regions should not overlap.
| Chromosome | Separator | Start point (bp) | Separator | End point (bp) |
|---|---|---|---|---|
| chr1 | : | 105000000 | - | 153500000 |
| chr4 | : | 5000000 | - | 6500000 |
| chrX | : | 85000000 | - | 93500000 |
Table 2: The format of a file used to import region data.
Filter by gene
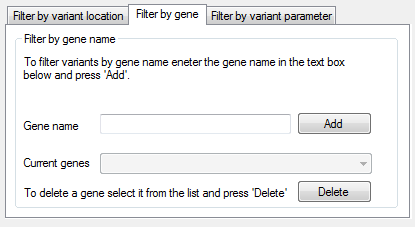
Figure 4: The Filter by gene tab
To filter the variants by the name of the gene in which they are located, enter the gene name in the Gene name text box in the Filter by gene name panel on the Filter by gene tab at the bottom of the window (Figure 4). To delete a gene name, select its name from the list and press the button. It is also possible to enter a list of gene names, using > and selecting a text file, within which each line should consist of a single gene name.
Filter by variant parameter
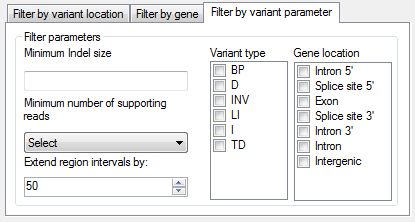
Figure 5: The Filter by variant parameter tab allows variants
to be filtered against a number of different characteristics.
It is possible to filter the variants against a number of different parameters using the options in the Filter parameters panel on the Filter by variant parameter tab at the bottom of the window (Figure 5). These options are described in detail below:
Filter options
- Minimum Indel size: filters the variants by the size of the deletion. If a variant does not contain a deletion (i.e. it's an insertion) it will be excluded.
- Minimum number of supporting reads: filters the variants by the total number of reads that suggest the presence of the variant.
- Extend region intervals by: when filtering the variants using a list of exon boundaries, this parameter extends the size of the intervals so that splice site variants are included.
- Variant type allows the selection of variants based on what type of rearrangement they are as defined by Pindel. If none of the options are selected, no filtering is performed on this parameter. The variant types are annotated by Pindel and identified using the abbreviations given by Pindel as follows:
-
- BP: break point
- D: duplication
- INV: inversion
- LI: large insertion
- I: insertion
- TD: tandem duplication
- Gene location allows variants to be filtered by gene features which are affected, e.g. if a variant disrupts an exonic sequence and a 5′ splice site, then it is retained if either “Exon” or “Splice site 5′” is selected. If no features are selected then the variants are not filtered on this parameter.
Filtering the data
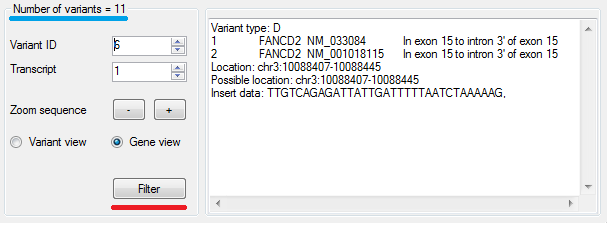
Figure 6: The button screens the variants using the current parameters
Once the filtering parameters have been set, the variant data are filtered by pressing the button (above the red line in Figure 6). The number of variants remaining after by the filtering process is shown in the panel's Title bar (above the blue line in Figure 6). The current variant's annotation as described by Pindel, along with its position in the transcript it affects, is given in the text box to the right of the button.
Importing and exporting filtering parameters
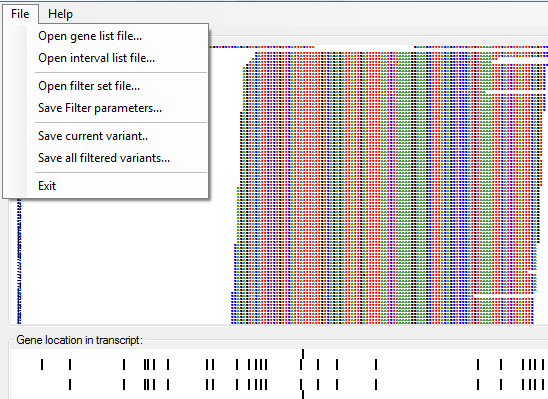
Figure 7: The menu allows filter options to be exported and reimported.
The menu item (Figure 7) allows the current filter parameter options to be saved to a text file, while the menu item allows the saved parameters to be imported into the current analysis.
Saving and exporting variants
It is possible to save either all the variants that have passed the filtering parameters or just the currently displayed variant. To save all the variants, select the > menu item (Figure 7) and enter the name of the target file. To save the currently displayed variant, select the > menu item (Figure 7) and enter the name of a file. If the specified file already exists, the data will be appended to the end of the file.